Automatic app installation allows IT admins to remotely deploy applications to managed Android devices without requiring user interaction. With Applivery, applications can be installed silently and efficiently across any size fleet—ideal for ensuring all employees have the critical tools they need for work, security compliance, or kiosk environments. Apps are assigned within policies and pushed directly from the console, simplifying rollout and reducing support needs.
Admins gain total control over which apps are installed, updated, or removed, and can automate deployments for new devices, role changes, or updates, guaranteeing consistent configurations across the organization. Applivery supports both system and third-party apps, with advanced features to configure managed properties, automate updates, and enforce app compliance—making Device Management effortless and robust for enterprise environments.
Managed Google Play #
The secret behind automatic app installation in Android Enterprise—and of course with Applivery—is Managed Google Play. Think of it as a special version of the Google Play Store, designed specifically for your organization.
With Managed Google Play, you control which apps are available to your employees and how they get installed.
Applivery connects directly to your Managed Google Play account, allowing you to manage and distribute apps centrally and automatically—no manual installs needed!
How to set up automatic app installation #
Step 1 - Make sure your devices are enrolled #
To ensure everything runs smoothly, your Android devices must already be registered and managed under Android Enterprise in Applivery. This means your Android Enterprise account is properly set up and your devices are enrolled—whether they’re company-owned devices, work profiles, or otherwise.
Step 2 - Add and approve your apps in Managed Google Play #
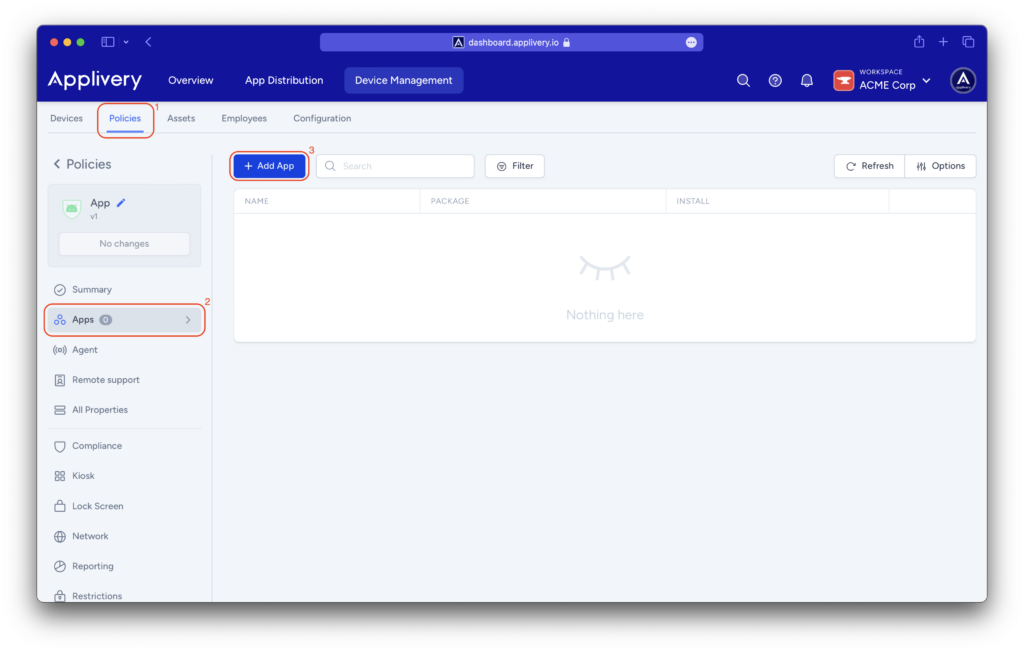
Once in the Applivery Dashboard, go to any of your Policies (1) (under Device Management > Policies). From the left side menu, go to Apps (2) and click the + Add App button (3).

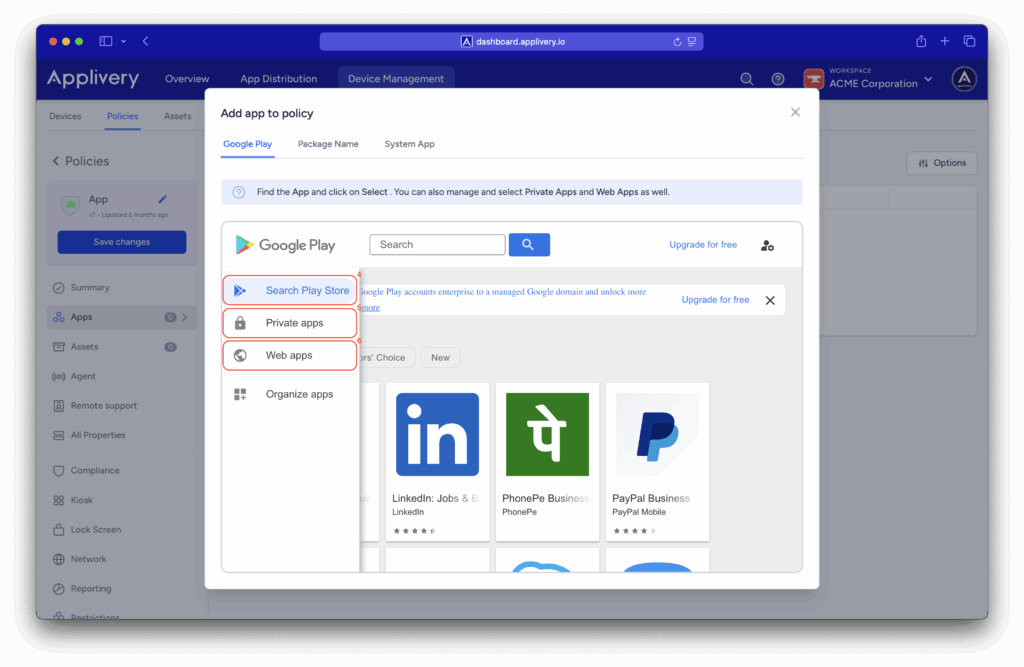
The Managed Google Play iFrame will open, allowing you to select from the following app types:
- Public Apps (4): If the apps are available on the regular Google Play Store, simply search for them and approve them directly from the Managed Google Play section in your Applivery console. Once approved, you can manage and assign them to your devices.
- Private Apps (5): For apps developed internally for your company, you can upload them as private apps to Managed Google Play directly from Applivery. Only your organization will have access to these apps.
- Web Apps (6): You can also turn your favorite websites into web apps within Managed Google Play, then deploy them automatically to devices as if they were native apps.

Step 2.1 - Assignment and install type #
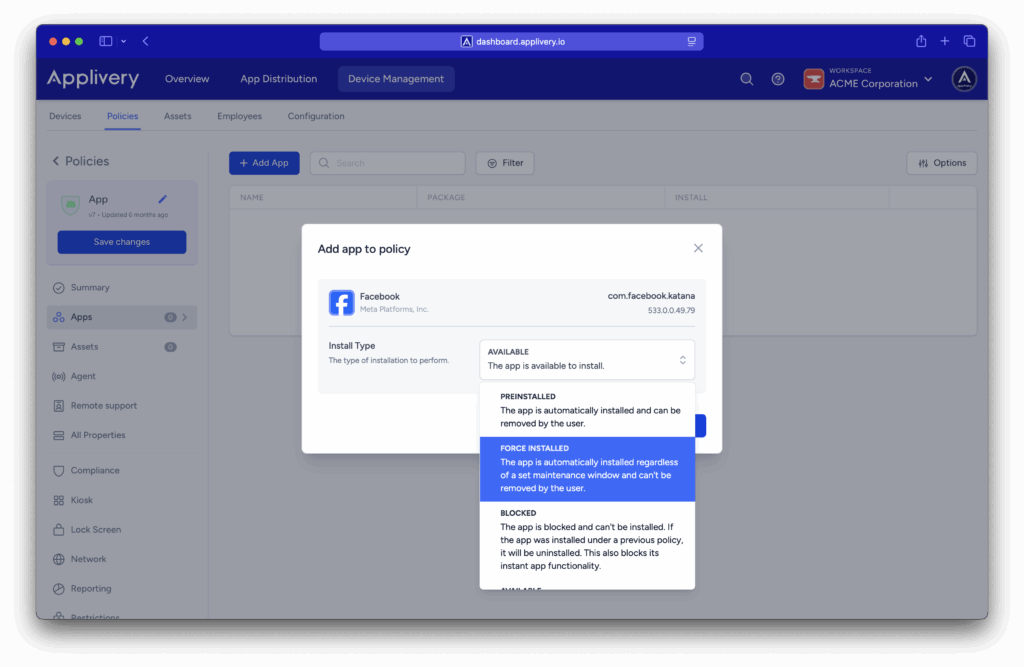
Applivery gives you a key option for automatic installation. If you select Forced Install, the app will be downloaded and installed automatically on the device—no user interaction required—and it cannot be uninstalled.
However, you also have a couple of other useful options:
- Available: Setting the installation type to Available lets you configure a Managed Google Play setup, making the apps you select available for users to download.
- Blocked: The app will be blocked and cannot be installed—even if the user tries to search for it in Managed Google Play. If the app was already installed on the device, it will be automatically uninstalled.

The Play Store Mode controls which apps are visible to users in the Play Store and how the device handles apps that are removed from the policy. By default, it is set to WHITELIST, meaning only apps included in the policy are available, and any app not in the policy will be automatically uninstalled.
You can also set it to BLACKLIST, where all apps are available by default, and only the apps you explicitly mark as Blocked will be restricted or removed from the device.
Applivery’s automatic app installation via Managed Google Play makes managing Android devices much easier. By setting apps as mandatory, you can ensure that your business applications are deployed quickly, efficiently, and consistently across all devices.