The provisioning of returned Apple devices is a broken protocol in most organizations. It’s a slow, error-prone process that creates unnecessary friction for both the IT team and the next employee who needs the device.
The question is, why do we keep doing it this way when Apple’s own framework includes a system designed to automate this process from start to finish?
That system is called Return to Service (RTS). It’s not an “extra” feature or a gimmick; it’s the way the lifecycle of a managed device was designed to work. If you’re not using it, you’re taking on technical risk and losing a huge amount of hours. We’ll explain what it is, why it’s superior to any manual method, and how to execute it from Applivery.
What Return to Service is and why it's not "just another feature"
Return to Service is a specific and brutally logical command within Apple’s management framework. Its sole mission is to execute a device setup sequence in a completely unattended manner.
When you send this command from your MDM, here’s what happens, with no human intervention:
- Data wipe: the device executes Erase All Content and Settings. This isn’t a simple cleanup; it’s a complete and secure wipe of the data partition.
- Connection and re-enrollment: immediately after being wiped, the device uses a network profile (Wi-Fi) you’ve provided to connect to the internet. Then, it finds the MDM server (yours, from Applivery) and automatically re-enrolls itself.
- Skip to the end: the device completely bypasses the setup assistant (the “Hello” screens, language selection, etc.) and lands directly on the home screen, already under your management and with all policies applied.
The result: a device goes from “used” to “production-ready” in the time it takes you to go grab a coffee.

From repetitive task to strategic advantage
Sometimes, a single smart change can trigger a chain reaction. Automating device setup frees up a technician. A freed-up technician improves a system. An improved system accelerates the entire company. This is where that domino effect begins.
- It’s the antidote to “human error”
Automation is consistent. It doesn’t forget to wipe a piece of data; it doesn’t mistype a Wi-Fi password. This means security and compliance no longer depend on a manual checklist but become a systematic and guaranteed process. It gives you peace of mind.
- The user experience is flawless
The next employee who receives that iPad turns it on, and it just works. There’s no friction. No calls to IT. This elevates the perception of your department from being reactive (“fixing problems”) to being proactive and efficient.
- It gives you back control of your most valuable resource: time
That time you used to spend on repetitive tasks can now be invested in optimizing the network, researching new solutions, or planning the next migration. It allows you to shift from “putting out fires” to strategy.
How to use Return to Service in Applivery
We’ve designed the process in Applivery to be as logical as the command itself. You don’t need to navigate through confusing menus.
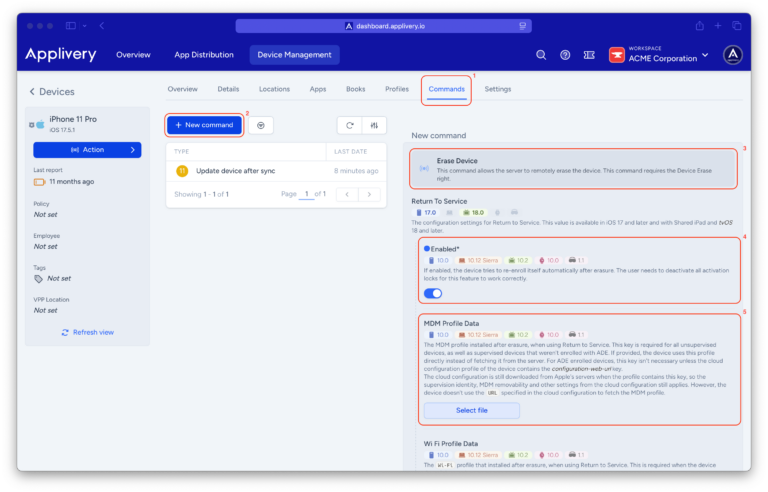
- In your dashboard, go to Device Management and choose the device you want to reset.
- Go to the Commands tab and click + New command.
- Select Erase device. You will see a simple switch: “Return to Service”. Enable it.
- The platform will ask you for two things (one mandatory, one optional):
- .mobileconfig enrollment file (Required): This is the file that tells the device, “once you’re wiped, you have to come back home to this Applivery MDM environment.” It’s its map back.
- .mobileconfig Wi-Fi profile (Optional but recommended): This allows the device to connect to the network on its own to complete the enrollment.
That’s it. You click, and the system takes care of the rest.

The #1 mistake to avoid: for this to work, the device must still “know” your organization. Never release it from your Apple Business Manager / Apple School Manager before executing the command. If you do, the device becomes a “stranger” and loses its ability to re-enroll automatically.
Regain control, device by device
Now you know the method. The alternative to spending hours on a manual, error-prone, and low-value process is within your reach. Implementing Return to Service isn’t just another optimization; it’s a conscious decision to value your time, bolster your security, and elevate the standards of your IT department.
Ready to automate the chaos?
Return to Service is your first step. If you want to discover the other tools to build a fail-proof Apple ecosystem, check out our documentation or request a demo.


