BitLocker is a built-in Windows encryption feature that safeguards your data by encrypting drives. It offers extensive customization options, including the choice of drives to encrypt, encryption methods, recovery options, and protectors.
With Applivery, you can enable BitLocker using different approaches:
- Silently, without user intervention, or with end-user interaction.
By applying BitLocker configuration policies or deploying custom PowerShell scripts.
The best method depends on your specific Windows and Microsoft environment.
Set up your silent policy #
To silently activate BitLocker using Applivery policies, the device must be joined to either Entra ID or Active Directory. This is required so BitLocker can back up the recovery keys.
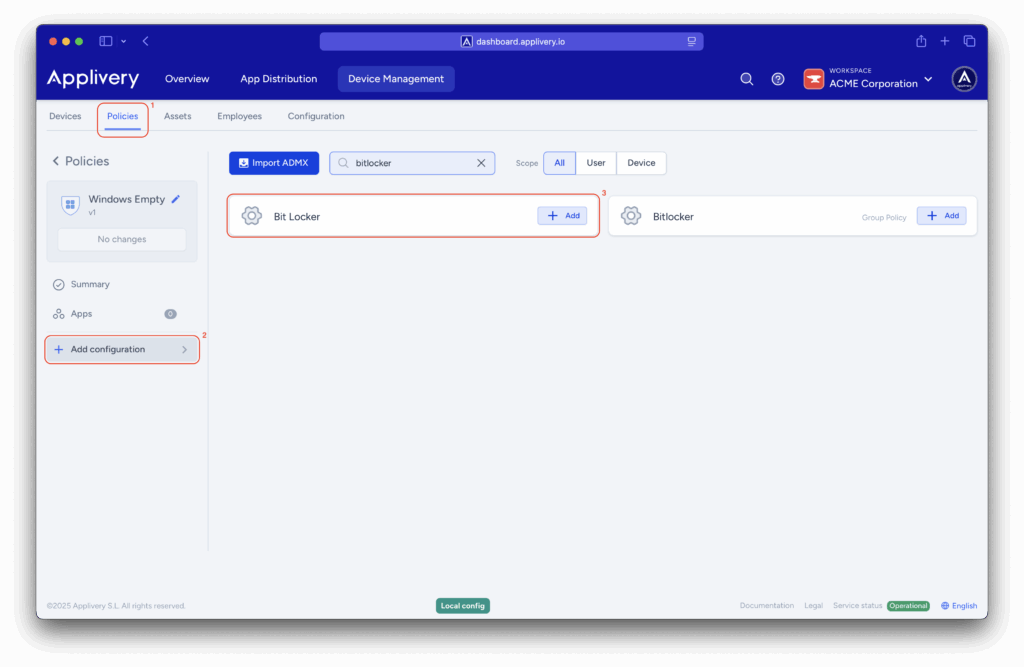
Once in the Applivery dashboard, head to the Device Management section and select Policies (1). Choose the policy where you want to configure BitLocker.
Then, from the left-hand menu, click + Add configuration (2) and use the search bar to find the BitLocker (3) configuration.

The deployment process is straightforward: BitLocker settings can be customized as needed, but the policy must include the following configurations:
-
Allow Standard User Encryption – Set to 1.
Enables the
RequireDeviceEncryptionpolicy to encrypt all fixed drives, even if the currently logged-in user is a standard (non-admin) account. -
Allow Warning for Other Disk Encryption – Set to 0.
Disables the warning prompt. Starting with Windows 10 version 1803, this value can only be set on Azure Active Directory–joined devices. When set to 0, Windows attempts to silently enable BitLocker.
-
Require Device Encryption – Set to 1.
Enforces device encryption. Setting this to 1 triggers encryption of all drives—silently or with user interaction—depending on the
AllowWarningForOtherDiskEncryptionsetting.
These settings ensure that encryption is enforced, standard user permissions are bypassed, and the recovery key is securely backed up to Entra ID or Active Directory.
Deploy BitLocker with user interaction #
If devices are not joined to Entra ID or Active Directory, you can still enable encryption using Applivery configuration policies—however, the deployment will not be silent:
- The user will be notified that the organization requires encryption.
- The user will be prompted to start the encryption process.
The user will choose where to save the recovery key.
In this scenario, you must enable the Require Device Encryption setting.
If your users are not local administrators, you must also enable the Allow Standard User Encryption setting.
Configure silent encryption using PowerShell #
You can activate BitLocker silently with a PowerShell script, even if your devices are not joined to Entra ID or Active Directory.
The following example enables BitLocker on the C: drive using TPM and a password protector. It saves the recovery key to the C: drive by default, but you can customize the save location to any folder or API endpoint:
					if (($pshome -like "*syswow64*") -and ((Get-WmiObject Win32_OperatingSystem).OSArchitecture -like "64*")) {
    # relaunch this script under 64 bit shell
    & (join-path ($pshome -replace "syswow64", "sysnative")\powershell.exe) -file $myinvocation.mycommand.Definition @args
    exit
}

# Set variables
$mountPoint = "C:"
$recoveryKeyPath = "C:\RecoveryKeys"  # Change this to your desired path
$timestamp = Get-Date -Format "yyyyMMdd_HHmmss"
$computerName = $env:COMPUTERNAME
$recoveryKeyFile = "$recoveryKeyPath\${computerName}_BitLockerKey_$timestamp.txt"

# Ensure the recovery key folder exists
if (-not (Test-Path $recoveryKeyPath)) {
    New-Item -Path $recoveryKeyPath -ItemType Directory | Out-Null
}
# Enable BitLocker with TPM and skip hardware test

Enable-BitLocker -MountPoint $mountPoint -EncryptionMethod XtsAes256 -TPMProtector -UsedSpaceOnly -SkipHardwareTest

# Add Recovery Password Protector
$protector = Add-BitLockerKeyProtector -MountPoint $mountPoint -RecoveryPasswordProtector

# Extract the recovery password and Id
$recoveryPassword = (Get-BitLockerVolume -MountPoint "C:").KeyProtector | Where-Object {$_.KeyProtectorType -eq 'RecoveryPassword'} | Select-Object -ExpandProperty RecoveryPassword
$keyProtectorId = (Get-BitLockerVolume -MountPoint "C:").KeyProtector | Where-Object {$_.KeyProtectorType -eq 'RecoveryPassword'} | Select-Object -ExpandProperty KeyProtectorId

# Save recovery password to file
"Computer Name: $computerName`nDrive: $mountPoint`nKey ID: $keyProtectorId`nRecovery Password: $recoveryPassword`nDate: $timestamp" | Out-File -FilePath $recoveryKeyFile -Encoding UTF8 -Force
Write-Host "Recovery password saved to: $recoveryKeyFile" -ForegroundColor Green
exit 0
Name the script activateBitlocker.ps1.
To avoid permission issues, run it via a scheduled task. Create another script named scheduledtask.ps1 to configure the task.
					$targetFolder = "C:\tempScriptFolder"
$scriptName = "activateBitlocker.ps1" # Change if you chose a different name.
$scriptDestination = "$targetFolder\activateBitlocker.ps1"
$taskName = "EnableBitLocker"

# Path where your Bitlocker activation script is within the msi file
$scriptPath = Join-Path -Path $PSScriptRoot -ChildPath $scriptName

#Creates a folder and copies script to it
New-Item -ItemType Directory -Path $targetFolder -Force | Out-Null
Copy-Item -Path $scriptPath -Destination $scriptDestination -Force

# Creates a scheduled task to execute the script.
schtasks /Create /TN $taskName /TR "Powershell.exe -WindowStyle Hidden -ExecutionPolicy bypass -File `"$scriptDestination`"" /SC ONCE /ST 00:00 /RL HIGHEST /RU SYSTEM /F

Start-Sleep -Seconds 3

# Runs the scheduled task immediately
schtasks /Run /TN $taskName

Start-Sleep -Seconds 3

# Removes the temporary folder and the scheduled task.
Remove-Item -Path $targetFolder -Recurse -Force
schtasks /Delete /TN $taskName /F
Place both scripts in the same folder, along with the following .bat file:
					@echo off
net session >nul 2>&1
if %errorLevel% NEQ 0 (
    powershell.exe -WindowStyle Hidden -ExecutionPolicy bypass -Command "Start-Process -Verb RunAs -FilePath 'cmd.exe' -ArgumentList '/c %~f0'"
    exit /b
)
powershell.exe -WindowStyle Hidden -ExecutionPolicy bypass -File "%~dp0scheduledtask.ps1"
Once the three files are packaged into a single .msi, upload it to Applivery and deploy it as an App within a policy:
- The
.batfile creates the scheduled task. - Required files are temporarily copied to the C: drive.
- BitLocker encryption is activated.
- Temporary files are automatically removed after completion.